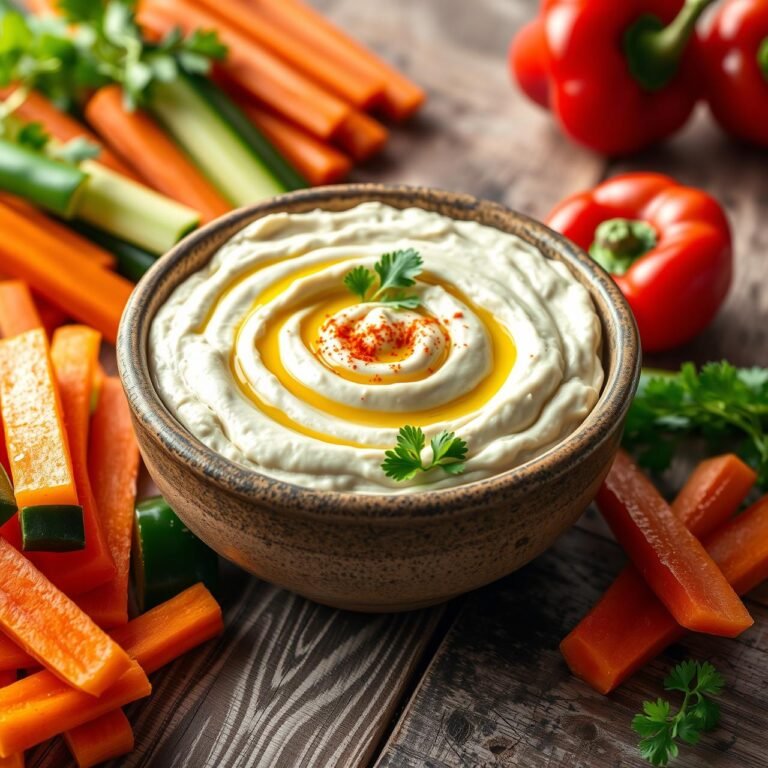
Vibrant Roasted Beet Hummus: The Antioxidant Packed Snack
There are few dishes that capture the eye as dramatically as Roasted Beet Hummus. Its brilliant, jewel-toned magenta hue is a feast for the senses before you even take the first bite. But this is more than just a pretty dip; it’s a powerhouse of flavor and nutrition. By taking the humble, earthy beet and slow-roasting it to sweet perfection, we unlock a depth that beautifully complements the creamy, nutty notes of traditional hummus. This recipe is a celebration of rustic, wholesome ingredients, transformed into an elegant, antioxidant-packed snack that is perfect for budget-conscious home cooks looking to elevate their culinary repertoire. Forget the store-bought tubs; crafting your own hummus is a simple, rewarding process that puts you in complete control of the final texture and taste. Prepare to create a dip that will become the vibrant centerpiece of any table.
Why This Roasted Beet Hummus Belongs in Your Kitchen
Before we gather our tools and ingredients, let’s appreciate what makes this recipe truly special. It’s a harmonious blend of culinary craft and nutritional science, offering benefits that go far beyond its incredible taste.
A Symphony of Flavors
The magic begins with roasting. This crucial step caramelizes the natural sugars in the beets, transforming their raw, earthy taste into something deeply sweet and complex. This sweetness is perfectly balanced by the nutty richness of tahini, the bright, acidic tang of fresh lemon juice, and the subtle warmth of garlic and cumin. It’s a sophisticated flavor profile that is both comforting and exciting.
Nutritional Powerhouse
Beets are renowned for their health benefits. They are packed with essential vitamins, minerals, and powerful antioxidants known as betalains, which are responsible for their vibrant color. Combined with the protein and fiber from chickpeas, this hummus isn’t just a snack; it’s a nourishing addition to your diet that can support everything from heart health to digestion.
Stunning Visual Appeal
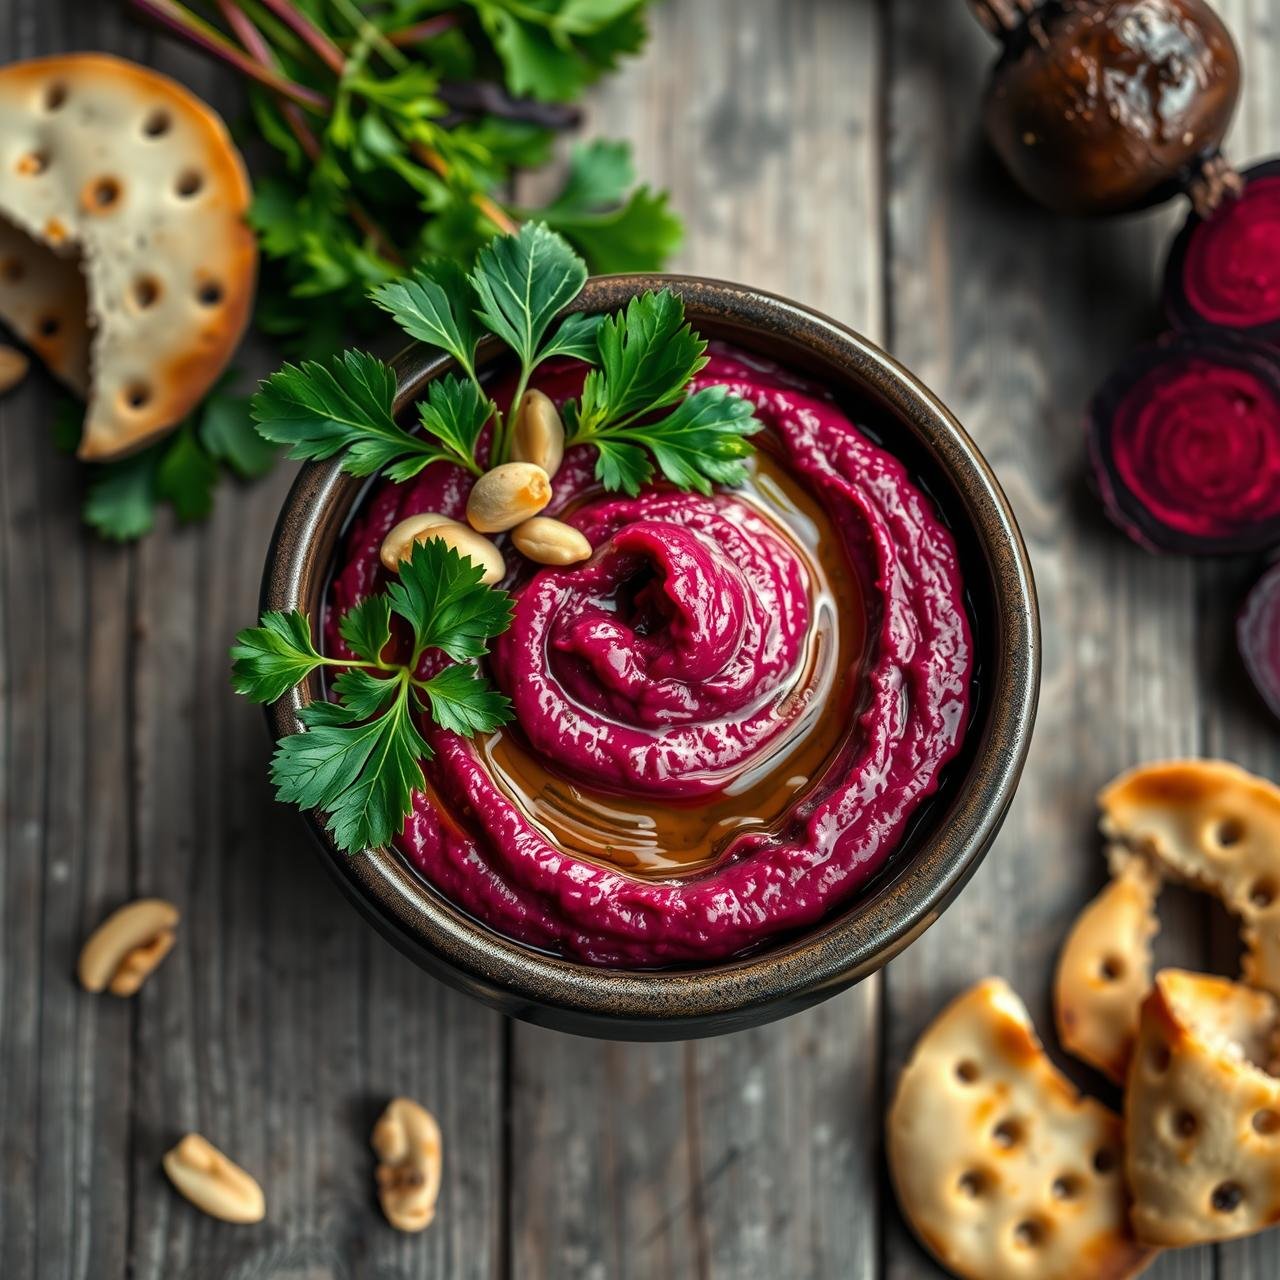
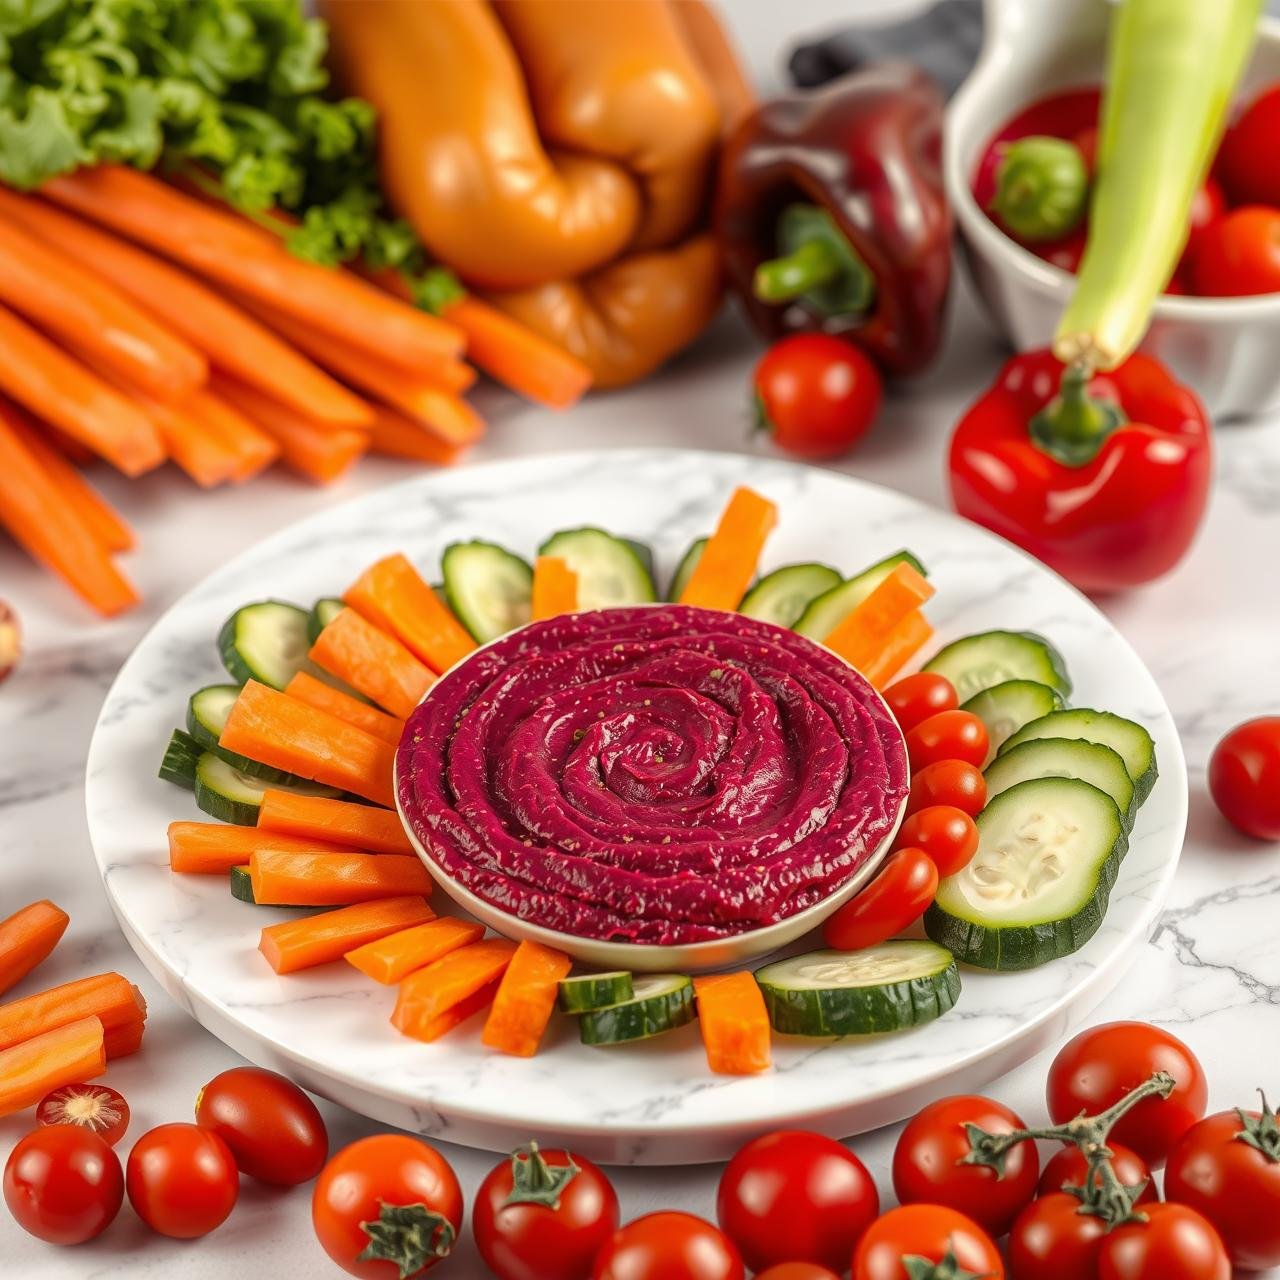
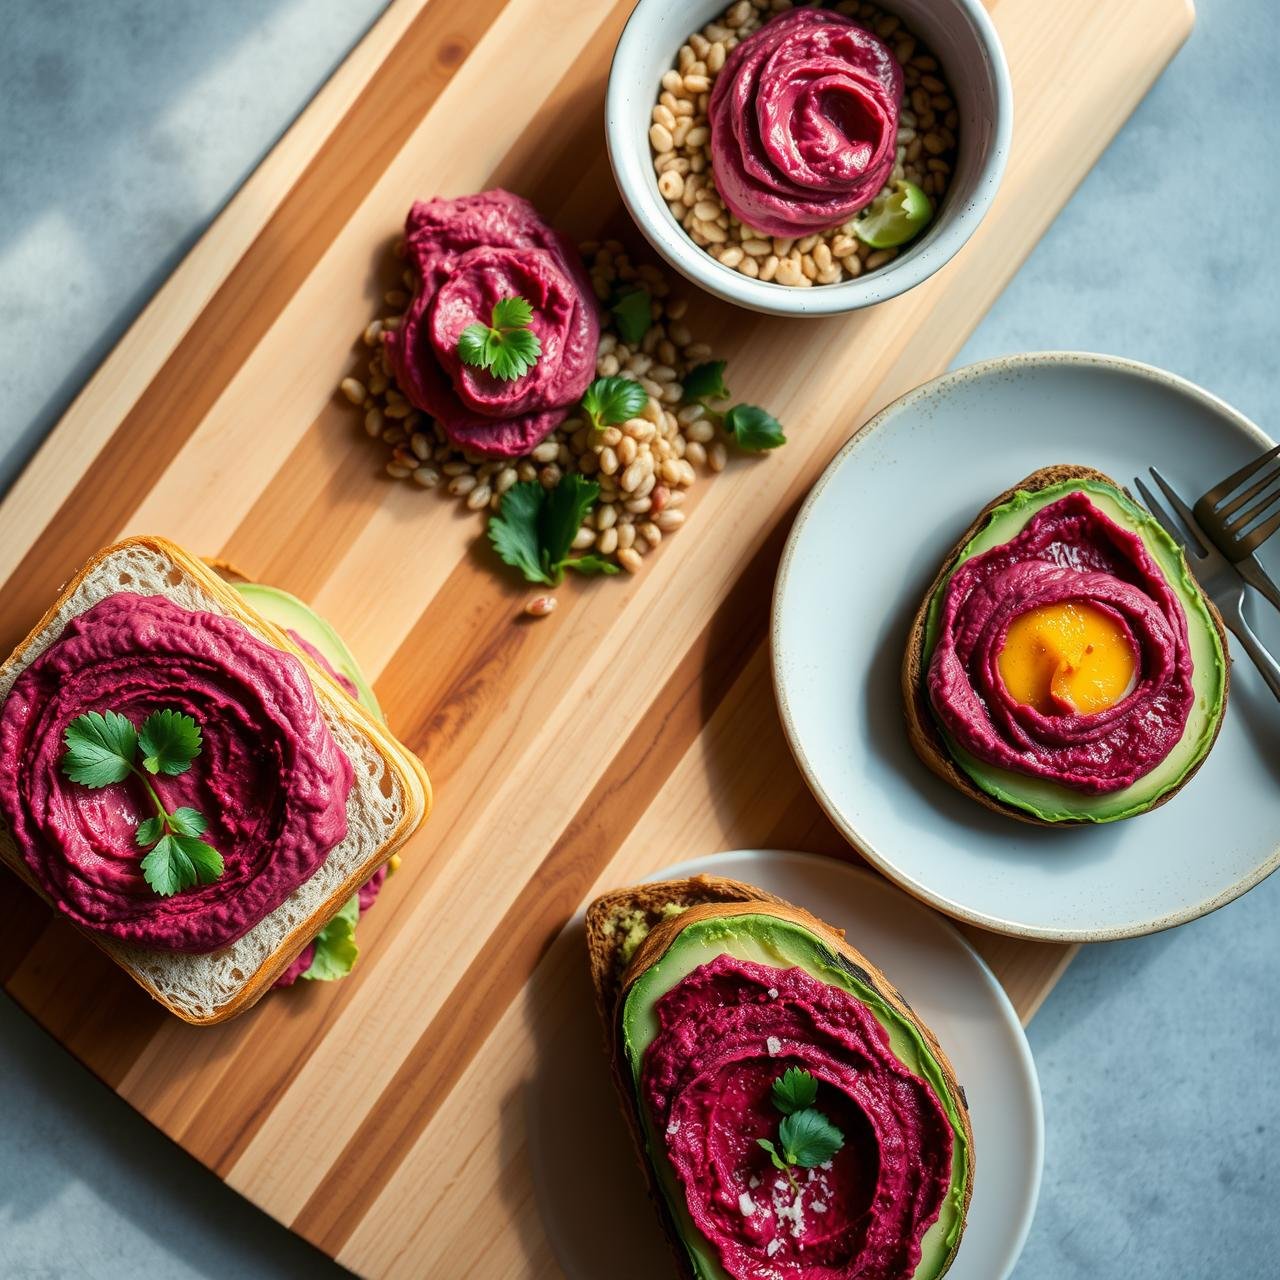
Let’s be honest: we eat with our eyes first. The spectacular color of this hummus makes it an instant showstopper. Serve it at a gathering, and it’s guaranteed to draw compliments. It’s an easy way to add a touch of elegance and a pop of color to an appetizer spread, a lunch bowl, or a simple plate of fresh vegetables.
Essential Equipment for Hummus Mastery
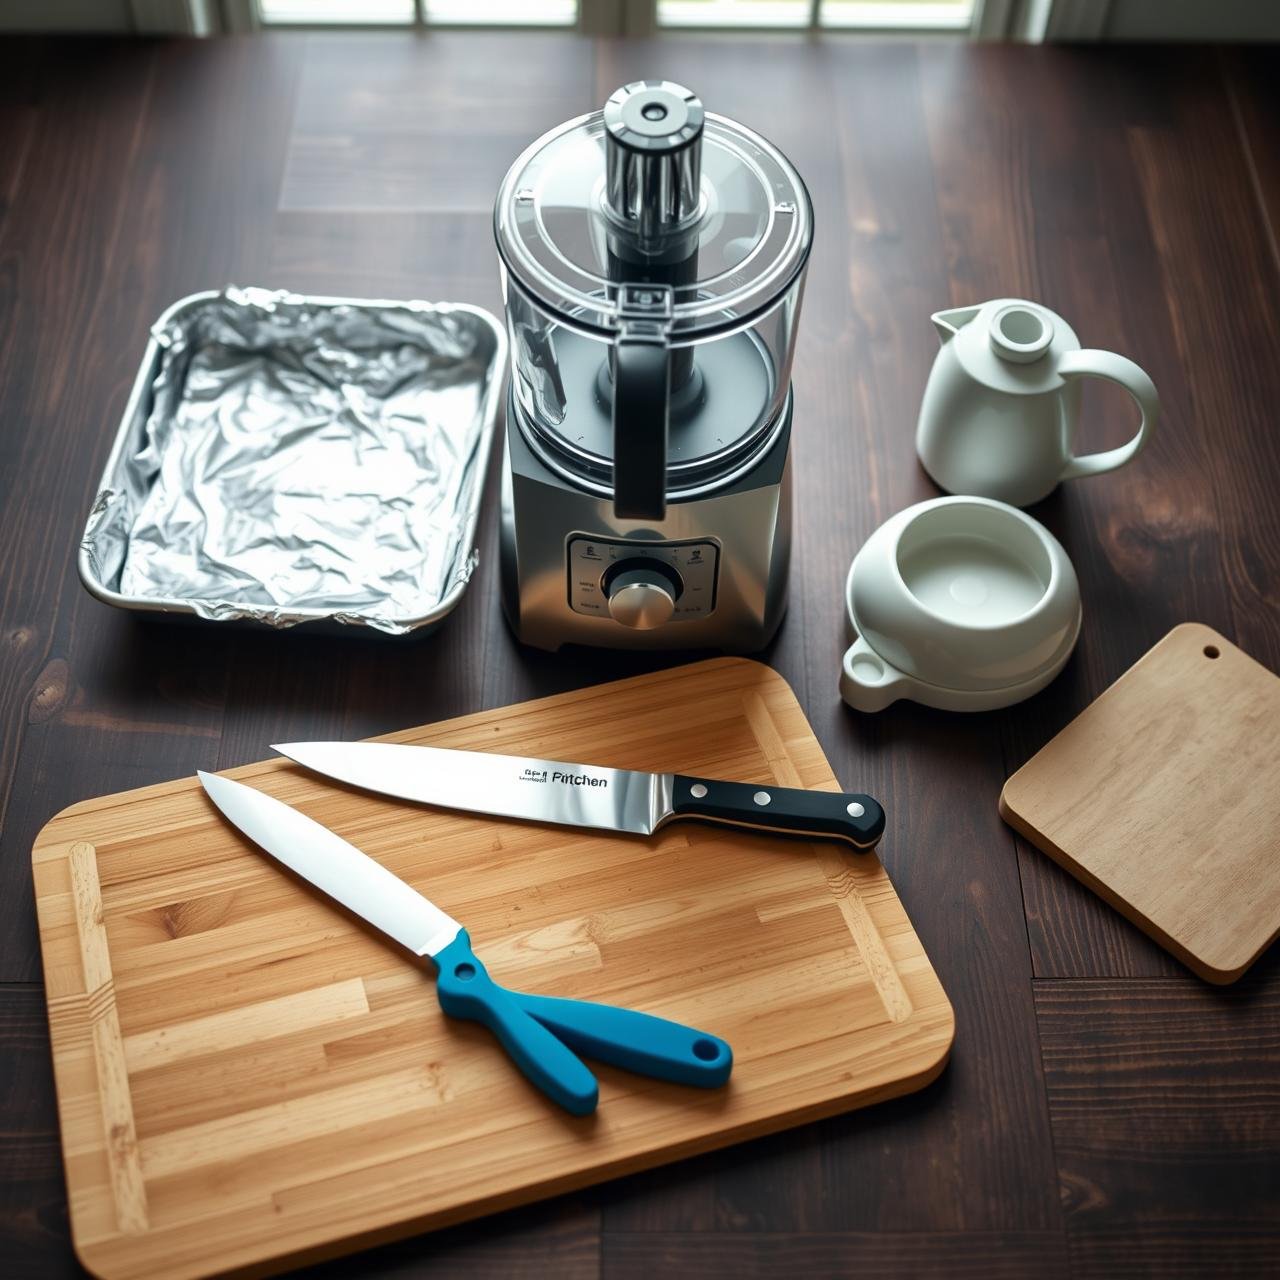
You don’t need a professional kitchen to create exceptional hummus, but a few key pieces of equipment will ensure a smooth, creamy result every time. Here is the simple toolkit required for this recipe.
| Equipment | Purpose |
|---|---|
| Food Processor or High-Powered Blender | This is the most critical tool. Its power is what transforms the ingredients into a luxuriously smooth dip. |
| Baking Sheet | A standard rimmed baking sheet is necessary for roasting the beets and garlic to perfection. |
| Aluminum Foil | Used to create a sealed packet for the beets, trapping steam to cook them through while they roast. |
| Sharp Knife & Cutting Board | For prepping the beets and other fresh ingredients. |
| Spatula | A flexible silicone spatula is essential for scraping down the sides of the food processor bowl to ensure everything is evenly blended. |
| Measuring Cups and Spoons | For accurate measurement of all ingredients, ensuring a balanced flavor profile. |
Gathering Your Wholesome Ingredients
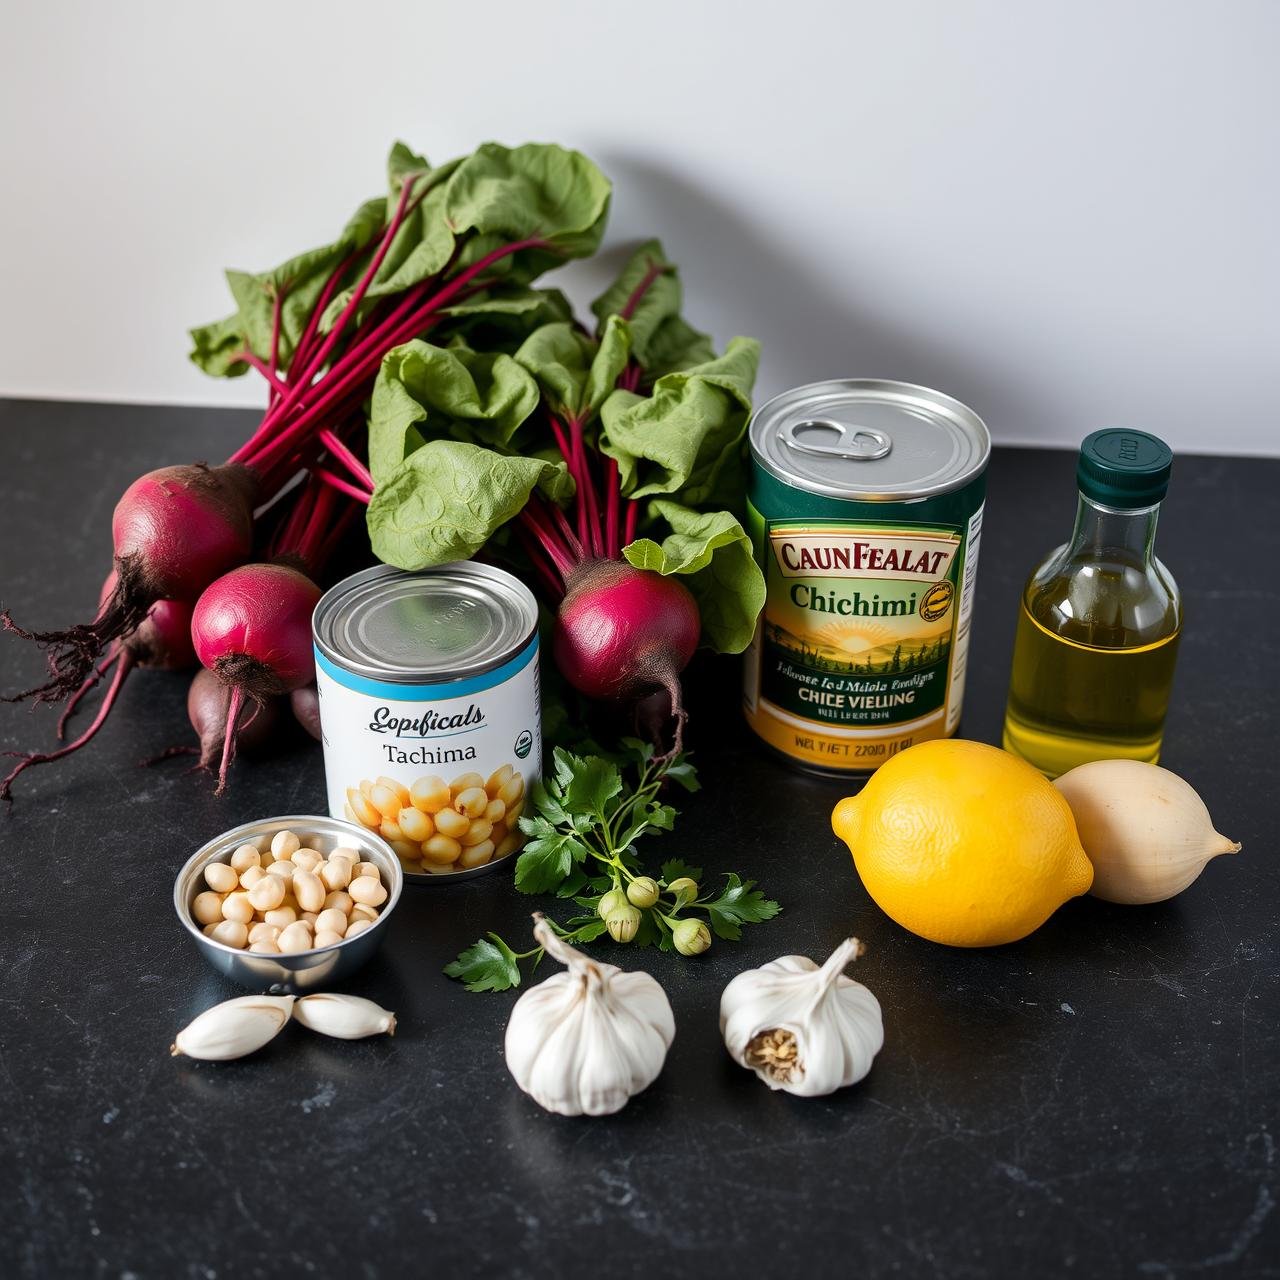
The quality of your hummus is directly tied to the quality of your ingredients. We’re using simple, accessible, and budget-friendly items to create this culinary masterpiece.
- 1 lb (about 2 medium) red beets, scrubbed clean
- 1 (15-ounce) can chickpeas (garbanzo beans), rinsed and drained
- 1/4 cup reserved liquid from the can of chickpeas (aquafaba)
- 1/3 cup high-quality tahini, well-stirred
- 1/4 cup freshly squeezed lemon juice (from about 1-2 lemons)
- 2-3 cloves garlic, left unpeeled
- 2 tablespoons extra virgin olive oil, plus more for drizzling
- 1 teaspoon ground cumin
- 1/2 teaspoon fine sea salt, or to taste
- For Garnish (Optional): Fresh parsley, toasted sesame seeds, pine nuts, or a sprinkle of za’atar.
A Note on Key Ingredients
Beets: Look for firm, round beets with smooth skin. The size doesn’t matter as much as the quality. Roasting them whole in their skins locks in moisture and flavor.
Tahini: This sesame paste is the soul of any good hummus. Choose a high-quality brand that is smooth and runny, not thick and pasty. A good tahini should taste nutty and rich, not bitter.
Chickpeas: Canned chickpeas are a fantastic time-saver and work perfectly for this recipe. For an even creamier texture, you can take the extra step of peeling the skins off the chickpeas after rinsing them, but it is not required.
Step-by-Step Instructions for Perfect Hummus
Follow these detailed steps carefully to achieve a hummus that is perfectly balanced in flavor and luxuriously smooth in texture. The process is straightforward and rewarding.
-
Roast the Beets and Garlic
Preheat your oven to 400°F (200°C). Trim the leaves and root ends from the beets, and scrub them thoroughly under cold water. Place the beets and the unpeeled garlic cloves on a large piece of aluminum foil. Drizzle with 1 tablespoon of olive oil and a pinch of salt. Fold the foil over to create a sealed packet. Place the packet on a baking sheet and roast for 50-60 minutes, or until the beets are tender enough to be easily pierced with a fork. The garlic will be soft and fragrant much sooner; you can remove it after about 20-25 minutes to prevent it from burning.
-
Prepare the Roasted Ingredients
Once the beets are cool enough to handle, use a paper towel or wear gloves to rub the skins off; they should slip off easily. Roughly chop the roasted beets into smaller chunks. Squeeze the softened, roasted garlic from its papery skin.
-
Combine the Base Ingredients
In the bowl of your food processor, combine the well-stirred tahini and the fresh lemon juice. Process for about 1 minute. The mixture will thicken and look a bit grainy—this is a process called emulsification. Scrape down the sides and bottom of the bowl.
-
Add the Core Components
Add the rinsed and drained chickpeas, the chopped roasted beets, the roasted garlic, ground cumin, and sea salt to the food processor. Secure the lid and process for 2-3 minutes until the mixture is thick and relatively smooth. Scrape the sides of the bowl as needed.
-
Stream in Liquids for Creaminess
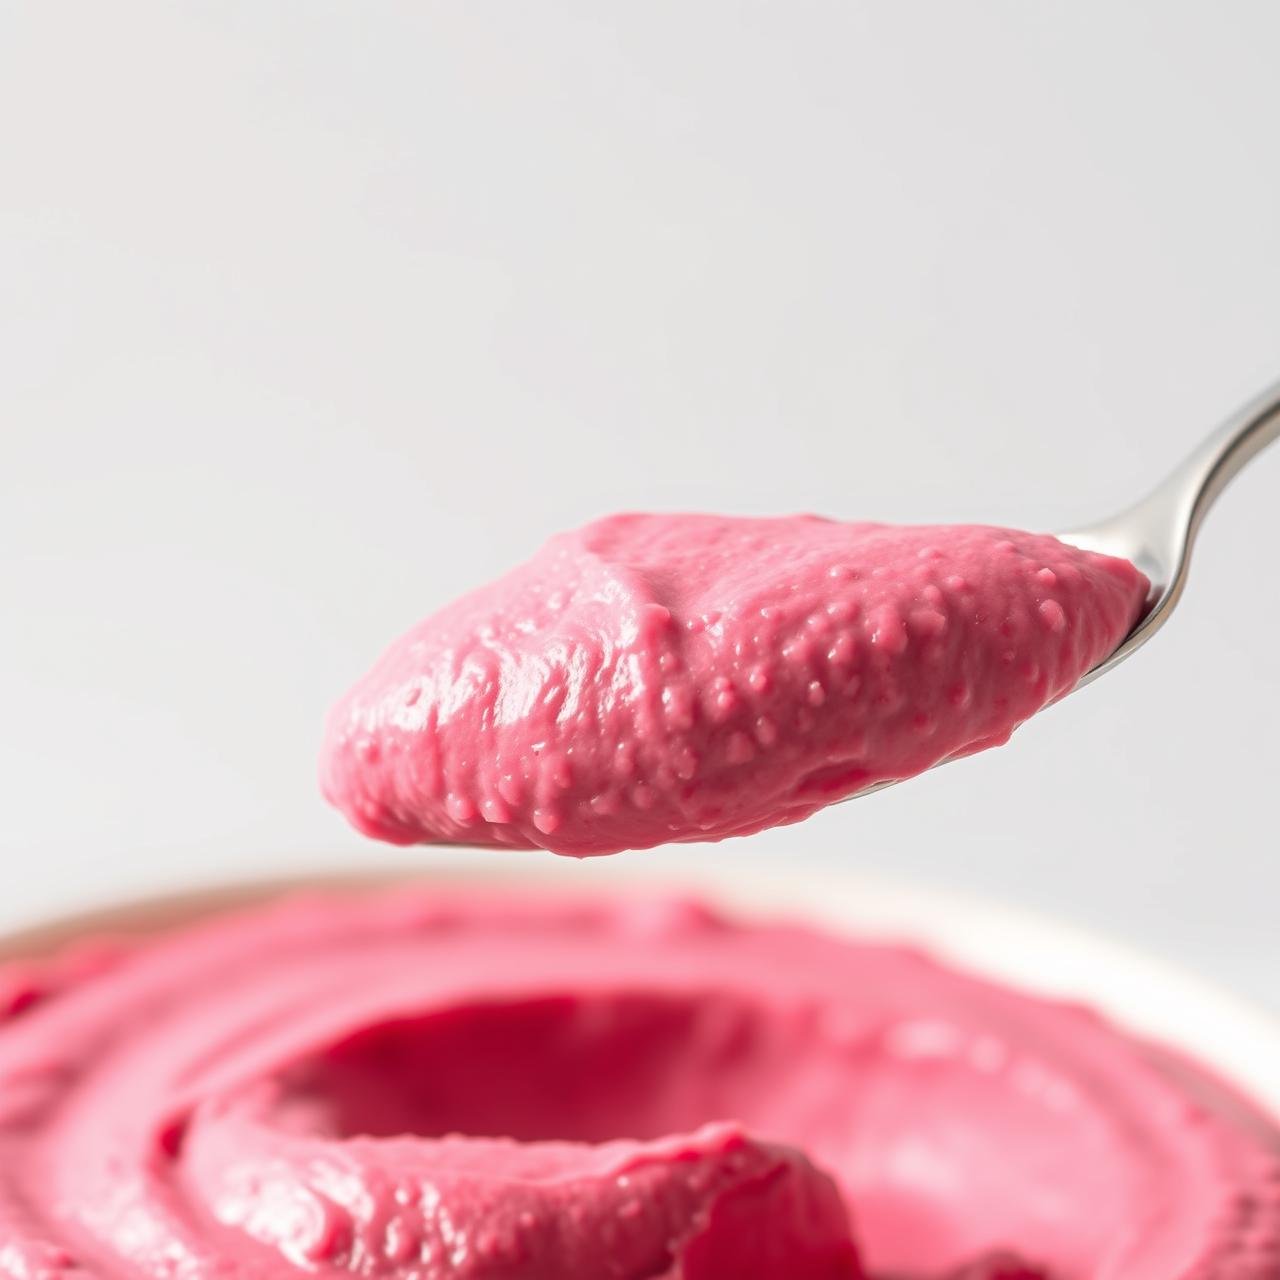
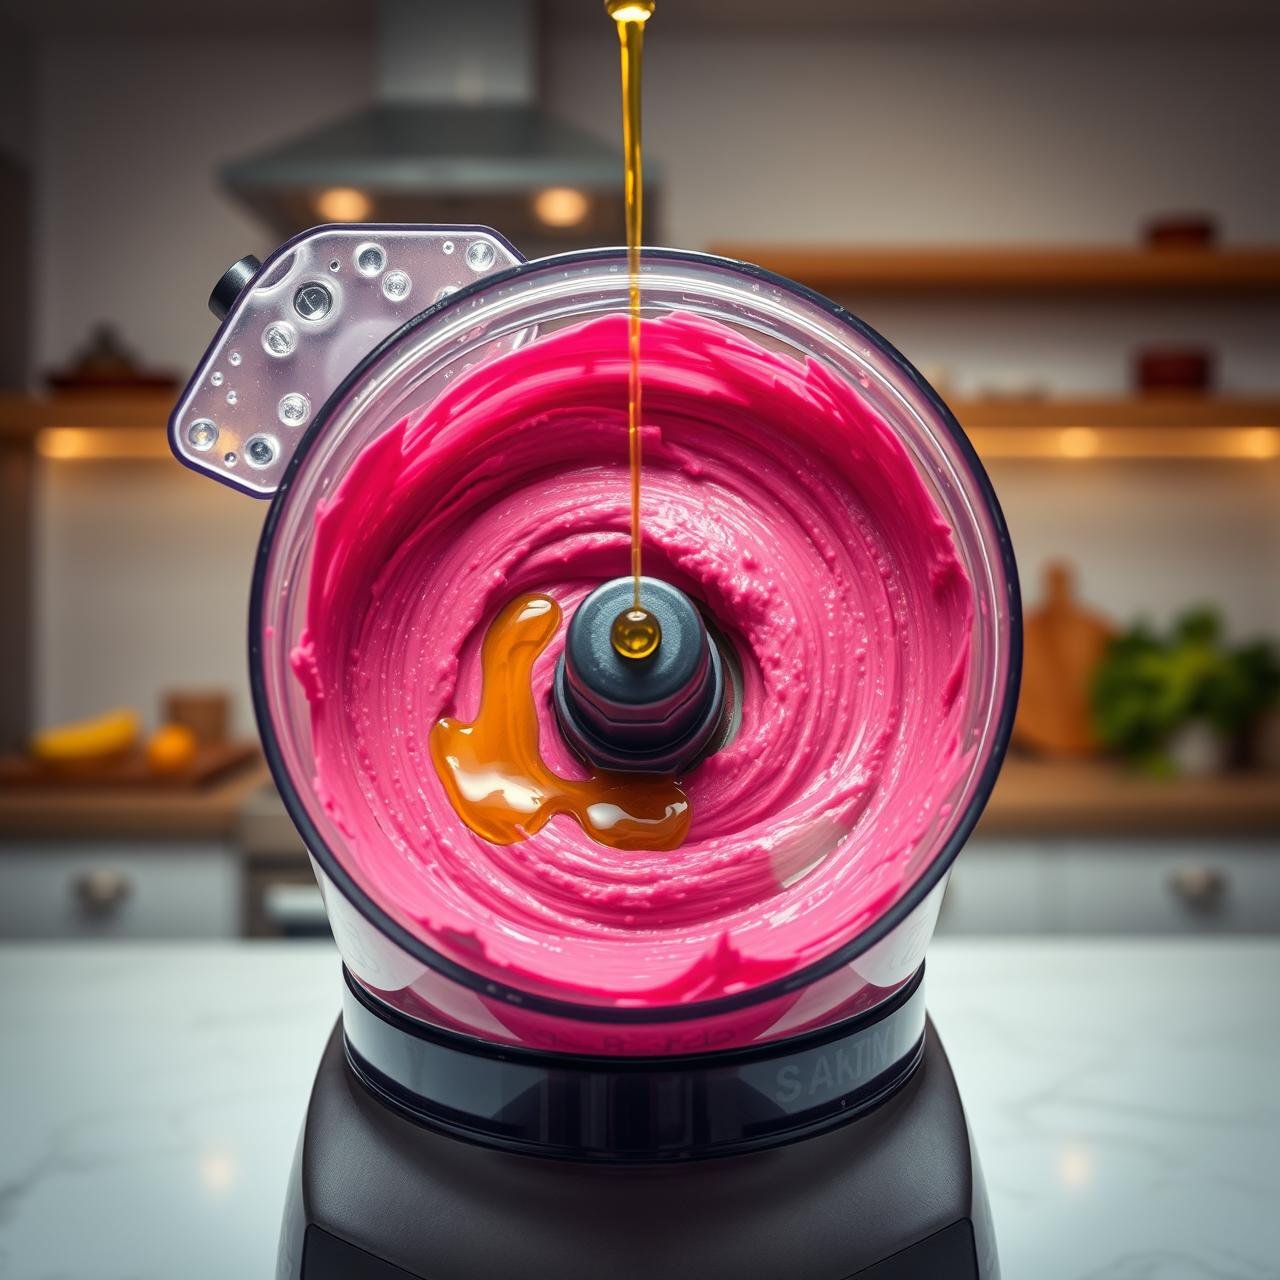
With the food processor running on low, slowly stream in the reserved chickpea liquid (aquafaba) and the remaining 1 tablespoon of olive oil. Continue to process for another 3-5 minutes. This extended blending time is the secret to exceptionally creamy hummus. The mixture will become lighter in color and velvety smooth.
-
Taste and Adjust
Stop the processor and taste the hummus. This is your moment to perfect it. Does it need more salt? A brighter tang from more lemon juice? A deeper earthiness from a pinch more cumin? Adjust the seasonings to your preference and give it one final blend to incorporate everything.
-
Serve and Garnish
Transfer the hummus to a serving bowl. Use the back of a spoon to create an elegant swirl on top. Drizzle generously with high-quality extra virgin olive oil and add your desired garnishes. Serve immediately with warm pita bread, crackers, or fresh vegetables.
Chef’s Tips for Hummus Perfection

Even a simple recipe has room for refinement. Here are some professional tips to elevate your beet hummus from great to unforgettable.
For Ultra-Smooth Texture
The ultimate secret to silky smooth hummus is to peel the chickpeas. It’s a bit tedious, but the results are undeniable. After rinsing the canned chickpeas, gently pinch each one between your thumb and forefinger; the skin will slip right off. For many, the extra creaminess is well worth the 10 minutes of effort.
Adjusting Consistency
Is your hummus too thick? With the processor running, add more aquafaba or cold water, one tablespoon at a time, until you reach your desired consistency. If it’s too thin, you can add a few more chickpeas to thicken it up.
Flavor Variations
- Smoky: Add 1/2 teaspoon of smoked paprika for a lovely, smoky depth that pairs wonderfully with the sweet beets.
- Spicy: Blend in a pinch of cayenne pepper or a dash of your favorite hot sauce for a gentle kick of heat.
- Herby: Fresh herbs like dill, mint, or cilantro can be blended into the hummus or used as a garnish for a burst of freshness.
- Zesty: Add the zest of one lemon along with the juice for an even brighter, more aromatic citrus flavor.
Make-Ahead Strategy
Hummus is a fantastic make-ahead dish. In fact, the flavors often meld and improve after a day in the refrigerator. Prepare it a day before you plan to serve it, store it in an airtight container, and simply give it a good stir and add your garnishes just before serving.
Nutritional Profile: A Healthy Indulgence
This Roasted Beet Hummus is a delicious snack you can feel good about eating. Here is an estimated nutritional breakdown per serving (assuming the recipe makes 8 servings of approximately 1/4 cup each).
| Nutrient | Amount Per Serving |
|---|---|
| Calories | ~135 kcal |
| Protein | ~4 g |
| Fat | ~9 g |
| Saturated Fat | ~1 g |
| Carbohydrates | ~11 g |
| Fiber | ~4 g |
| Sugars | ~4 g |
| Sodium | ~250 mg |
Disclaimer: The nutritional information provided is an estimate and can vary based on the specific ingredients and quantities used.
Proper Storage and Serving Suggestions
Storing Your Homemade Hummus
To keep your beet hummus fresh and delicious, transfer it to an airtight container. A thin layer of olive oil poured over the surface can help prevent it from drying out. Stored properly in the refrigerator, your homemade hummus will last for up to 5-7 days.
Serving Suggestions: Beyond the Dip
While fantastic as a dip, this versatile hummus can be used in many other creative ways:
- As a Sandwich or Wrap Spread: Swap out mayonnaise for a healthier and more flavorful spread. It’s incredible with grilled vegetables, feta cheese, and fresh greens.
- On Toast: A colorful and nutritious alternative to avocado toast. Top with a sprinkle of everything bagel seasoning or a few crumbles of goat cheese.
- A Base for Bowls: Add a generous dollop to grain bowls or salad bowls to add creaminess, protein, and a boost of flavor.
- A Topping for Proteins: Serve a spoonful alongside grilled chicken, fish, or falafel for a vibrant and tasty sauce.
Conclusion
Creating your own Vibrant Roasted Beet Hummus is a simple act of culinary alchemy. With just a handful of wholesome, budget-friendly ingredients, you can produce a snack that is leagues beyond anything you can buy at the store. The deep, sweet flavor of roasted beets, the creamy texture, and the stunning visual appeal make this recipe a true kitchen staple. Whether you’re serving it as an elegant appetizer, packing it for a healthy lunch, or simply enjoying it as a nourishing snack, this hummus is sure to brighten your plate and delight your palate. Embrace the process, adjust it to your taste, and enjoy the delicious, antioxidant-packed rewards of your efforts.